Showing posts with label squares. Show all posts

Wednesday, August 12, 2020

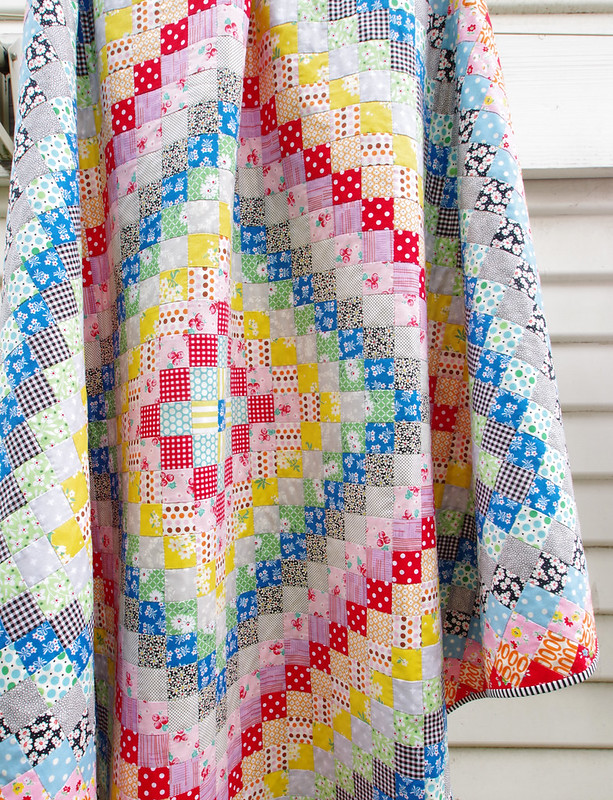
The finished Scrappy Cross Quilt

Scrappy Cross Quilt - Tutorial Available - © Red Pepper Quilts 2020

My Scrappy Cross Quilt is finally finished. It's taken several weeks to get around to stitching down the binding, and longer still to take photos. For the last decade or so I have worked almost exclusively on one project/quilt at a time. It's just how things rolled. But over the last 12 months I've added more and more projects to my steadily growing selection of works in progress, and whilst all that is good and well, I have knuckled down and I am keeping myself occupied by completing those quilt tops, basting, quilting and binding. Done.

Scrappy Cross Quilt - Tutorial Available - © Red Pepper Quilts 2020

Fabrics
All fabrics are from stash. Some are relatively new additions, others are my go-to favorite that I have had on hand for some time, pieces of which have made their way into my scrap bins. The many 2" fabric squares were cut from fabric scraps and collected over many months, and I continue to cut more such squares for future scrap busting quilts.

Scrappy Cross Quilt - Tutorial Available - © Red Pepper Quilts 2020

Finishing
I have finished the quilt by using a light-weight cotton batting called QuiltLite. Quiltlite is a woven cotton fabric similar to a loosely woven flannel fabric; it offers the presence of batting without adding bulk. (See a close-up photo of QuiltLite here).

Scrappy Cross Quilt - Tutorial Available - © Red Pepper Quilts 2020

I have machine quilted the quilt by ditch stitching all seam lines; simple and functional lines of stitching rather than decorative quilting, which at the same time gives the quilt a lovely texture and a soft drape, especially so with the light weight batting. For the back of the quilt I have used my favorite text fabric Newsprint from the Story collection by Carrie Bloomston, and have matched it a red/white stripe binding fabric.

Scrappy Cross Quilt - Tutorial Available - © Red Pepper Quilts 2020

QUILT DETAILS
Scrappy Cross Quilt 
Finished quilt measures 54 inches x 67.5 inches.
Started: May 2020
Finished: August 2020
Machine pieced and machine quilted (domestic sewing machine).
Yellow solid fabric: Robert Kaufman Kona Cotton in Grellow.

This quilt is made from just two blocks that are alternated throughout. 
I have written a tutorial here:

Scrappy Cross Quilt - Tutorial Available - © Red Pepper Quilts 2020

Sadly, I am not selling my quilts at the moment. We're in lockdown(!) and are not going anywhere for the time being. On the bright side, I have all the quilting supplies and time. Lots of time... 

I will make my quilts available again when domestic and international shipping settles into a reliable new normal. Quilts will then be listed in my Etsy Store.

Scrappy Cross Quilt - Tutorial Available - © Red Pepper Quilts 2020


COPYRIGHT: Do not copy or use any content or photos from my blog without my written permission. This is original content from www.redpepperquilts.com.

Sunday, June 14, 2020

Scrappy Cross Quilt and Tutorial

Work in Progress
Scrappy Cross Quilt and Tutorial | © Red Pepper Quilts 2020

My first machine pieced quilt for the year! It's been so long since I switched on the trusty Juki but having plenty of home time and a significant fabric stash meant there was no excuse for lounging around. Although I did plenty of that too. 

Scrappy Cross Quilt and Tutorial | © Red Pepper Quilts 2020

Scrap quilts are my favorite, especially simple designs pieced from small patches of fabric. I have a shoe box full of 2 inch squares that I add to regularly. Whenever I cut fabric for a quilt and have a small scrap of fabric leftover, I cut that piece into 2 inch squares and add it to the shoe box. And if I am using a fabric that lends itself to fussy cutting, I fussy cut a few additional 2 inch squares and add those as well. I think you'll see quite a few fabrics here that I have used before, and fabrics that you too may have in your stash.

Scrappy Cross Quilt and Tutorial | © Red Pepper Quilts 2020

BASIC SCRAPPY CROSS QUILT TUTORIAL

This quilt is inspired by a vintage quilt that was more than likely hand pieced. To machine piece this quilt top I broke down the design into simple repeats and a block based layout. This quilt is made from just two blocks that are alternated throughout: Block A on the left and Block B on the right. It doesn't get any easier than that. The blocks are sewn together in horizontal rows of four squares each.

Scrappy Cross Quilt and Tutorial | © Red Pepper Quilts 2020

I like to press seams together to one side, rather than open. If you consistently follow the arrows as indicated below all of your seams will nest when you sew the individual blocks AND when you sew the blocks together into a quilt top. So, for row 1 of Block A press seams to the right, for row 2 of block A press seams to the left etc.

Scrappy Cross Quilt and Tutorial | © Red Pepper Quilts 2020

Scrappy Cross Quilt and Tutorial | © Red Pepper Quilts 2020
Click on any image for a larger view.

TOTAL BLOCKS REQUIRED
Block A - 50*
Block B - 49 

FABRIC REQUIREMENTS
Solid Fabric: 3/4 yards 
Printed Fabric: 1415 two inch squares

*For block A: rather than cut 3 individual squares of solid fabric,
 I have cut a rectangle piece measuring 5 inches x 2 inches.

Once you've made the required number of blocks lay out your blocks starting with Block A and alternating Block A and Block B throughout (eleven horizontal rows of 9 blocks each). Sew blocks together into rows and then sew long rows together into a quilt top. 

Scrappy Cross Quilt and Tutorial | © Red Pepper Quilts 2020

The final step to complete the quilt top is to add an additional row of squares along the top edge of the quilt top and the left hand side of the quilt top so that the design is symmetrical - see the rows below as indicated by the arrows (pictured above).

Scrappy Cross Quilt and Tutorial | © Red Pepper Quilts 2020
Quilt top measures 54 inches x 67.5 inches.
Solid fabric: Robert Kaufman Kona Cotton in Grellow.
Started: May 2020
Finished: June 2020

I have loved piecing this quilt top together. It's been a long time since I have enjoyed sitting at the machine and I was very pleased to feel so comfortable and back in the zone. I have missed it.

Scrappy Cross Quilt and Tutorial | © Red Pepper Quilts 2020

This is a great "leaders and enders" project if you normally used this technique to start and end your seams. I don't use a scrap of fabric to start and end my sewing, but I can see how that would be of benefit if you're having bird's nest issues, or fabric getting jammed into the bobbin area. I do also like the idea of working on a second project at the same time.

Scrappy Cross Quilt and Tutorial | © Red Pepper Quilts 2020

I have made good progress on this quilt. It has been basted and quilted. I have even added the binding, but the hand slip stitching of the binding is yet to be done.

Scrappy Cross Quilt and Tutorial | © Red Pepper Quilts 2020

Thank you for stopping and browsing through the photos. If you have any questions please regarding the tutorial please let me know in the comments and I will reply there.

Rita

RELEVANT LINKS
More Red Pepper Quilts Tutorials
More RPQ Scrappy Quilts:

COPYRIGHT: Do not copy or use any content or photos from my blog without my written permission. This is original content from www.redpepperquilts.com.

Sunday, March 1, 2020

A Hand Pieced Trip Around the World Quilt

A Finished Quilt
A Hand Pieced Trip Around the World Quilt | © Red Pepper Quilts 2020

When I say things are slowly returning to "normal" I mean super slowly ... like snail paced ... but I am good with it. I am embracing slow and as well as being keen to learn new techniques. This quilt is entirely hand pieced. Hand pieced as in - - - - - running stitch with needle, thimble, and thread.

A Hand Pieced Trip Around the World Quilt | © Red Pepper Quilts 2020

It turns out that I can do slow, I can hand piece and sew secure seams; the quilt top did not fall apart when I picked it up, nor when I pressed the seams! In addition, I thoroughly enjoyed hand piecing the quilt top. Who knew?

A Hand Pieced Trip Around the World Quilt | © Red Pepper Quilts 2020

I have always enjoyed choosing what fabric to use and where, and this particular traditional quilt design allows for quite some fun fabric play. Choosing what goes next was intense and I planned ahead maybe 3 to 4 rounds at a time, but even so I often changed my mind as each row (or round/trip of fabric) was added. I have cut several rounds of fabric squares that have remained unused! Maybe they're ready cut for the next Trip Around the World Quilt.

A Hand Pieced Trip Around the World Quilt  - stitching, seams, and pressing | © Red Pepper Quilts 2020

Above is a photo of the back of the quilt top. You can see the pencil marked seams, the running stitch, as well as how the seams were pressed. The stitches are far from perfect - they are not all even, nor consistent length - but they do the job. I did a small back stitch at the start and end of each seam, and added a back stitch every 4 to 5 stitches to secure the stitches/thread.

A Hand Pieced Trip Around the World Quilt | © Red Pepper Quilts 2020

QUILT DETAILS
Hand Pieced Traditional Trip  Around the World Quilt
The finished quilt measures 58 inches x 58 inches.
1625 squares measuring 2" x 2" (includes seam allowances).
Started: 26 December 2019.
Finished: 22 February 2020.
Hand Pieced.
Start with the center square then add a "trip"
around the centre square (ie add 4 squares).
Continue by adding additional trips - each additional trip requires an
additional four fabric squares.

A Hand Pieced Trip Around the World Quilt | © Red Pepper Quilts 2020

Fabrics
All fabrics are from stash. Some are relatively new additions, others are my go-to favorite that I have had on hand for some time. Choosing fabrics from stash became more difficult once a trip around the quilt required more than a fat quarter of fabric. No single trip of fabric required more than a 1/2 yard of fabric.

Notions / Tools
All 2" fabric squares were cut using a rotary cutter and ruler.
After cutting all squares were marked with a ¼ inch seam allowance.
I use a mechanical pencil with a 2B 0.7mm lead
for ease of marking a line on the fabric.
Jeana Kimball's Foxglove Cottage -Sharps Needle - size 10.
Aurfil 50wt thread (the orange spool) for hand piecing.

A Hand Pieced Trip Around the World Quilt | © Red Pepper Quilts 2020

Finishing
I have finished the quilt by using a light weight cotton batting called QuiltLite. Quiltlite is a woven cotton fabric similar to a loosely woven flannel fabric; it offers the presence of batting without adding bulk.

I have then machine quilted the quilt by ditch stitching all seam lines; simple and functional rather than decorative quilting, which at the same time gives the quilt a lovely texture and a soft drape. For the back of the quilt I have used my favorite text fabric Newsprint from the Story collection by Carrie Bloomston, and have matched it with my signature black/white stripe fabric for the binding.

A Hand Pieced Trip Around the World Quilt | © Red Pepper Quilts 2020

I will continue to update my blog with photos of my quilts as and when I have something to share. I am still sewing - oddly I have a second completed hand-pieced quilt top ready for quilting - but I am finding myself easily distracted and ready to start new projects, rather than complete my quilt tops.

Thank you for stopping by and scrolling through the photos. Don't hesitate to contact me if you have any questions (redpepperquilts@gmail.com).

Rita

RELEVANT LINKS:
More RPQ Trip Around the World Quilts (Machine Pieced):


Follow RPQ on:
COPYRIGHT: Do not copy or use any content or photos from my blog without my written permission. This is original content from www.redpepperquilts.com.

Tuesday, October 3, 2017

Many Trips Around the World Quilt - Work in Progress

Many Trips Around the World Quilt - Work in Progress | © Red Pepper Quilts 2017
Many Trips Around the World Quilt
Click on any image for a larger view.
It's back to basics this week. Squares, Squares, and more squares. I do love traditional quilt design, simple patchwork, and working from stash, so this Many Trips Around the World Quilt design suits me perfectly! It also is an extension on my previous quilt (and quilt pattern) - The Scrappy Day Trip Quilt - this time adding an extra trip for each block.

Many Trips Around the World Quilt - Work in Progress | © Red Pepper Quilts 2017

This Many Trips Around the World Quilt design is a great scrap buster project and represents hours of cutting, puzzling, and sewing together a whole bunch of patchwork pieces. Having said that, I am always determined to find the easiest way to put together a quilt; to simplify the process and at the same to ensure that when it comes to sewing the quilt top together that all the seams nest. 

Many Trips Around the World Quilt - Work in Progress | © Red Pepper Quilts 2017

So I revisited my Scrappy Day Trip Quilt Pattern - which is a block based design with strip pieced sections - and I reworked it for the extra trip - or round of squares - around the center square. This allowed me to work on just one block at a time; cutting fabric, strip piecing and sewing together each block as far as was possible. Once all 50 blocks were ready - plus a whole bunch of half blocks to fill the edges - I could arrange and re-arrange the blocks until I was happy with the layout, and then sew together the quilt top in rows.

Many Trips Around the World Quilt - Work in Progress | © Red Pepper Quilts 2017

Mind you, it was still a bit of a puzzle, and sewing together the quilt top required my careful attention to ensure that all the pieces ended up in the right place. I can look at this quilt top now and say how fun it was to make, but at the time of sewing my inner voice demanded to know why the small pieces, and why so many!!  Of course, when all the quilt blocks are laid out on the floor, and the quilt top is ready to be sewn together, there's no stopping until it is done.

Many Trips Around the World Quilt - Work in Progress | © Red Pepper Quilts 2017

QUILT DETAILS
Many trips Around the World Quilt
Quilt top measures 49 inches x 61 inches.
49 rows of 39 squares.
Each finished square measures 1.25" x 1.25".
Total number of squares: 1911.
Fabric Used:
Approx 100 different small scale prints including
many stash basics - dots, stripes, checks, gingham.

Many Trips Around the World Quilt - Work in Progress | © Red Pepper Quilts 2017

I love this scrappy and colorful quilt top, and all the time spent carefully choosing fabrics, cutting, and piecing has been worth it. I have a feeling that there may be more Many Trips Quilts in my future.

Many Trips Around the World Quilt - Work in Progress | © Red Pepper Quilts 2017

Although I am not so much looking forward to basting the quilt top, I cannot wait to start quilting it!

Thank you for stopping by and scrolling through the many photos!
Rita

Many Trips Around the World Quilt - Work in Progress | © Red Pepper Quilts 2017

RELEVANT LINKS:
Scrappy Day Trip Quilt and Quilt Pattern 
Many Trips Around the World - the Finished Quilt
More RPQ Scrap Quilts:
Scrappy Trip Along Quilt - January 2013
Philadelphia Pavement Quilt - October 2013
Single Irish Chain Quilt - October 2015
Giant Granny Square Quilt - May 2016

Pin It!
Follow RPQ on:
COPYRIGHT: Do not copy or use any content or photos from my blog without my written permission. This is original content from www.redpepperquilts.com.

Friday, March 28, 2014

A Great Granny Square Quilt

A finished quilt.
Great Granny Square Quilt - all the details
Great Granny Square Quilt 
This quilt was so much fun to make!  The Granny Square blocks came together really well considering I had chosen to work with 1.5 inch squares - fiddly but definitely workable - and the fabric play was oh so satisfying. 

patchwork granny square block
patchwork block - granny square quilt

Once the the nine Granny Square blocks were finished I had set my mind to making a large pillow cover. However, my eye caught the leftover pieces of Melange Yarn Dyed fabric from a previous project, and I couldn't resist the winning combination of these traditional blocks with a linen look wide border. 


Then the quilting began ... I quilted the patchwork blocks by first stitching edge to edge lines (running through the center of each block) both horizontally and vertically, and then I ditch stitched around the center panel and individual blocks, stopping and starting as required, and burying all thread ends into the batting by hand.

quilting detail for the Great Granny Square patchwork blocks

For the back of the quilt I have used a single fabric from the Briar Rose collection by Heather Ross. This Stawberry print is darling and a perfect match for this quilt (and a great quality fabric to boot).

Briar Rose by Heather Ross - Strawberries quilt back fabric
Briar Rose by Heather Ross - Strawberries - Quilt back fabric

Once quilted I rounded the corners of the quilt. I used a dinner plate to mark the curves on the quilt with a permanent marker (not so smart - note to self, use a fabric pen instead), then followed the marked lines with my rotary cutter.  

Quilt with rounded curved corners - and bias quilt binding machine stitched

Rounded quilt edges means that there are no corners to mitre. Bonus! But it does mean having to make bias binding - made from fabric strips cut across the diagonal of a square of fabric - which gives the fabric sufficient ease to hug the curves. It's so much easier than it looks or sounds. 

Granny Square quilt - linen border, rounded corners, bias binding

This quilt is for sale and it listed in my Etsy Store.

The listing details are here: Granny Square Quilt

Granny Square quilt - linen border and rounded corners

Thank you for stopping by and enjoy the weekend!
Rita

RELEVANT LINKS:

Pin It!