Showing posts with label 2016 Work in Progress. Show all posts

Tuesday, December 20, 2016

Yours Truly ~ A Flying Geese Quilt

Work in Progress
Yours Truly - Flying Geese Quilt | Work in Progress | © Red Pepper Quilts 2016

Yours Truly by Kim Kight for Cotton + Steel is due is stores in January and I was grateful to snap up a fat quarter bundle (indirectly) from Sample Spree at Quilt Market. Kim and Alexia Marcelle Abegg's fabric collections for C + S have so far been the collections that I have been drawn to the most. Their designs often include prints that are smaller in scale and in a (softer and lighter) color palette that is more suited to my style and preference for fabric. And I love Yours Truly!

Yours Truly - Flying Geese Quilt | Work in Progress | © Red Pepper Quilts 2016

Inspired by vintage love-themed fabrics and garments the Yours Truly collection features strawberries, raccoon-like critters, tiny scattered hearts and ribbons, a small scale floral design, and a grid print. The strawberries though ... are the very best! The color palette is warm and includes both saturated colors as well as as several lighter (and brighter) colors including a soft grey, and neon pink.

Yours Truly - Flying Geese Quilt | Work in Progress | © Red Pepper Quilts 2016

I was so pleased with my purchase that I cut into the bundle almost immediately - I didn't even take photos of the fabric bundle for a future Sunday Stash blog post! In addition to using almost all of the prints that are part of the Yours Truly collection I have added several more fabrics from previous C + S collections including a red gingham fabric (Checkers), and a floral pink fabric from the Lucky Strike collection also by Kim Kight.

Yours Truly - Flying Geese Quilt | Work in Progress | © Red Pepper Quilts 2016
Yours Truly - Flying Geese Quilt
45 inches x 55 inches.
The quilt design is a simple and traditional Flying Geese quilt (each Flying Geese unit measures 3 inches x 5 1/2 inches including seam allowances). I really wanted to highlight the prints by way of contrasting the designs with a solid background fabric and so for the "wings" of the Flying Geese units I have used a number of Robert Kaufman Kona Cottons and Essex Yarn Dyed linen in Flax, as well as Oakshott shot cottons from the Scandinavia collection.

Yours Truly - Flying Geese Quilt | Work in Progress | © Red Pepper Quilts 2016

I am really pleased with this quilt top! The colors play so well together and I can't wait to add texture and additional visual interest that comes with quilting, especially when quilting solid fabrics.

Yours Truly - Flying Geese Quilt | Work in Progress | © Red Pepper Quilts 2016

As always, thank you for stopping by!
Rita

RELEVANT LINKS:
Yours Truly - the Finished Flying Geese Quilt
Sunday Stash - Oakshott Scandinavia
More RPQ Flying Geese Quilts
RPQ Cotton + Steel projects:
Printshop Pineapple Quilt - August 2016
Bluebird Log Cabin Quilt - March 2016
Cotton + Steel Quilt - December 2014
Cotton + Steel Selvage Pillow Cover - December 2014
Garland Pillow Cover - December 2016

Pin It!
Follow RPQ on:
COPYRIGHT: Do not copy or use any content or photos from my blog without my written permission. This is original content from www.redpepperquilts.com.

Tuesday, December 6, 2016

Rectangle Checkerboard Quilt 2

Work in Progress
Rectangle Checkerboard Quilt 2 | © Red Pepper Quilts 2016

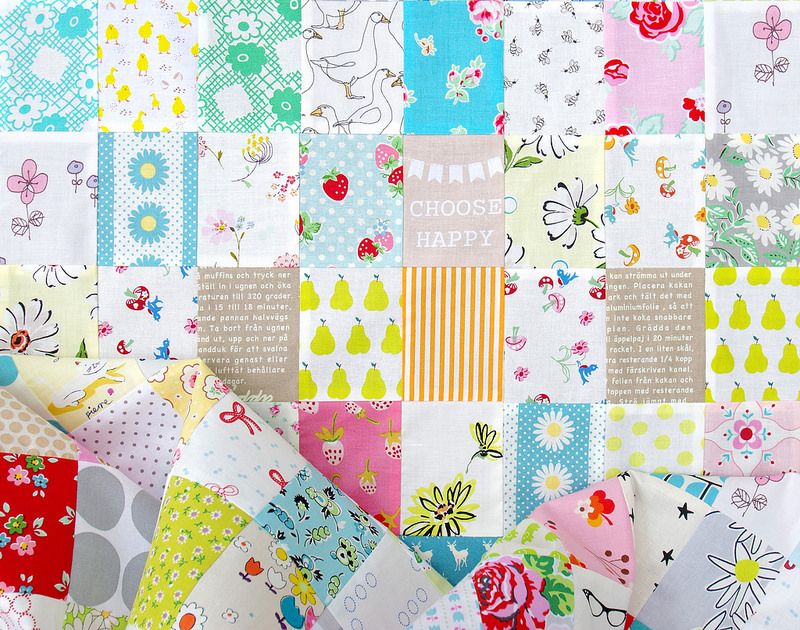
Back to basics. Simple patchwork, easy sewing, and busting both scraps and stash. I love working with fabrics from my stash and this week I have spent a considerable amount of time digging deep into my fabric stash in search of the "favorites". I have many fabric favorites and I have no problem jumbling all of these different prints and colors together. It's bright and colorful, but most of all pulling together a quilt like this makes me ridiculously happy. 

Rectangle Checkerboard Quilt 2 | © Red Pepper Quilts 2016

As with all of my Checkerboard Quilts I have contrasted a light, or low volume, fabric alongside a darker, more saturated in color, fabric. This quilt was strip pieced using the Checkerboard Quilt and Strip Piecing Tutorial, piecing a total of thirty-six 16-patch blocks. Most fabrics are repeated no more than 3 times and I did time some time to randomize the units; adding in the many individually fussy cut fabrics as well as taking strip sets apart to mix with others.

Rectangle Checkerboard Quilt 2 | © Red Pepper Quilts 2016

QUILT STATS
Rectangle Checkerboard Quilt #2
A selection of almost 180+ different quilting cottons make up this quilt.
I made 36 16-patch blocks :: a total of 576 patches of fabric.
* Cut strips 2 3/4" inches x 11 inches and
cut sewn strips sets at 3 1/2" intervals *
(makes more sense if read in conjunction with the tutorial)
Each 16-patch block measures 9.5 inches x 12.5 inches.
Each finished rectangle measures 2.25 inches x 3 inches.
Quilt top measures 54.5 inches x 72.5 inches.

Rectangle Checkerboard Quilt 2 | © Red Pepper Quilts 2016

I love how this came together; a modern I Spy Quilt of sorts with various fabrics featuring items that may draw attention (like birds, cats, chickens, deer and ducks, as well as fruits, faces, and the many flowers. Strawberries in various colors and sizes feature often!

Rectangle Checkerboard Quilt 2 | © Red Pepper Quilts 2016

Ready for basting and quilting.

More soon,
Rita
Pin It!
Follow RPQ on:

COPYRIGHT: Do not copy or use any content or photos from my blog without my written permission. This is original content from www.redpepperquilts.com.

Thursday, November 3, 2016

Flowering Snowball Quilt 2

Work in Progress.
Flowering Snowball Quilt 2 - Work in Progress | © Red Pepper Quilts

I loved piecing the Flowering Snowball blocks for my first Flowering Snowball Quilt so much that as soon as I had finished that quilt I ordered a new set of templates. A set of smaller templates to piece a finished 6" finished block. I wondered at the time if I could actually pull that off ... 

Flowering Snowball Quilt 2 - Work in Progress | © Red Pepper Quilts

Well, yes I can. After a few test blocks that turned out surprisingly good I forged ahead with this quilt top. The pieces are small and the curve is a little tighter but all of the cutting and sewing principles are exactly the same. 

Flowering Snowball Quilt 2 - Work in Progress | © Red Pepper Quilts

This is such a versatile block! The potential to change the design by the placement of fabric and the use of color is limited only by imagination. For this quilt I have chosen to go with a scrappy look and all blocks are the same; low volume prints for the four "corners" of the block and a contrast printed/color fabric for the "petals" of the block. No further intricate planning was required for this layout.

Flowering Snowball Quilt 2 - Work in Progress | © Red Pepper Quilts

Many of these small fabric pieces were rescued from my scrap bin (all of which took much longer than anticipated!) and I have also used fabrics from stash. Again, no pins (nor basting glue) were used to piece the individual blocks and the same can be said for piecing the blocks into a quilt top.

Flowering Snowball Quilt Block - pressing seams
Flowering Snowball Quilt Block
- pressing seams
I do however like to nest my seams and I was able to nest all seams by pressing the seams for all blocks in exactly the same way. I did not clip any of the curved seam allowances and with a warm and gentle steam iron the blocks pressed up very nicely.

Flowering Snowball Quilt 2 - Work in Progress | © Red Pepper Quilts

QUILT STATS
Flowering Snowball Quilt 2
Quilt top measures 48 inches x 60 inches.
A total of 80 Flowering Snowball Blocks.
(10 rows of 8 blocks).
Each finished block measures 6 inches x 6 inches.
720 patchwork pieces.
That tiny black center square measures 1/2" x 1/2".
Flowering Snowball Quilt 2 - Work in Progress | © Red Pepper Quilts

Now ready for basting and quilting!

More soon.
Rita
Flowering Snowball Quilt 2 - Work in Progress | © Red Pepper Quilts

RELEVANT LINKS:

Pin It!
Follow RPQ on:
COPYRIGHT: Do not copy or use any content or photos from my blog without my written permission. This is original content from www.redpepperquilts.com.

Wednesday, October 12, 2016

Aerial Grove Quilt and 80wt Aurifi Thread Giveaway!

Aerial Grove Quilt - Applique Panel | © Red Pepper Quilts 2016

A few weeks ago I received a surprise package in the mail from the Fat Quarter Shop filled with a rainbow of the most beautiful Aurifil 80wt threads on wooden spools. Aurifil 80wt thread is 100% cotton thread. It is much finer/thinner than 50wt thread (the higher the number the finer the thread), and it is great for English Paper Piecing, machine applique, and in particular hand applique.

Aurifil 80wt Threads for Applique | © Red Pepper Quilts 2016

My experience with applique is limited to machine applique (my very first - and second - quilt were both machine applique quilts). I have however no previous experience with hand applique and after a brief moment of panic I accepted the challenge that these threads represented. I think the best way to learn a new skill is to tackle the task with confidence. So why not tick another quilt off my quilt bucket list?

Aerial Grove Quilt - Applique Panel | © Red Pepper Quilts 2016

The Aerial Grove Quilt is a more recent addition to my quilt bucket list. It is a design from the book Savor Each Stitch: Studio Quilting with Mindful Design by Carolyn Friedlander.


The Aerial Grove Quilt features a panel of organic hand cut squares with rounded corners that are first thread basted and then hand appliqued onto a background fabric. I love everything about this quilt; especially the opportunity for color play and the free form look of the "circles". No two patches are the same with the result being a free form and organic look. Of course this also is a challenge for me. 

Aurifil 80wt Threads
Aerial Grove Quilt - Applique Panel | © Red Pepper Quilts 2016

My work is usually exact and structured and giving up control and the self imposed expectation of a precise outcome was not easy. After several frustrating failed attempts at achieving the perfect rounded corners I decided that the best way to move forward was to confiscate my seam ripper. No more false starts, just keep going. Once I embraced the perfectly imperfect shapes there was no looking back and I was indeed able to savor each slow stitch.

Aerial Grove Quilt - Applique Panel | © Red Pepper Quilts 2016

As with any new skill this project took considerable time and all of my concentration. If I have made it look like that I whipped this panel up overnight that would be a misrepresentation. I spent 5 whole days working on the five rows of applique squares, and I loved working with these threads!

Aurifil 80wt Threads
Aerial Grove Quilt - Applique Panel | © Red Pepper Quilts 2016

I have color matched the thread with the fabric pieces whenever possible. I love how easy it is to make the tiniest of stitches that hug a curve evenly and how the fine thread disappears into the fabric, hiding even my early clumsy and uneven stitches. I am so thankful to have had the opportunity to step outside of my comfort zone and try a new technique. 

Aerial Grove Quilt - Applique Panel | © Red Pepper Quilts 2016

Panel background fabrics from left to right:

With thanks to the Fat Quarter Shop for this opportunity and for entrusting me with this bounty of beautiful threads! This may be my first applique project but I know it is not my last.

GIVEAWAY DETAILS

Kimberly and the team at the Fat Quarter Shop are giving away a complete set of 36 spools of Aurifil 80wt thread to one lucky RPQ reader. Valued at over $US100.00!

Aurifil 80wt thread
Aurifil 80wt thread - image by The Fat Quarter Shop
and used with permission.
To be in the draw all you need to do is leave a comment. Email me if you are not able to leave a comment (redpepperquilts at gmail dot com) and I will leave a comment on your behalf. International readers are welcome to enter. Only one entry per person/email address.

Click on any image for a larger view.
A winner will be drawn and announced by edit to this post at 8pm on Friday 14 October 2016 (Australia EDT). The winner will be contacted by email.

Thank you for all of your entries.
ENTRY HAS NOW CLOSED
===================

The winner of the Aurifil 80wt threads is:
Shannon has been contacted by email.

With thanks to the Fat Quarter Shop for such a generous giveaway!

Good luck everyone.

RELEVANT LINKS:
Pin It!
Follow RPQ on:

COPYRIGHT AND DISCLOSURE: Aurifil threads supplied by the Fat Quarter Shop. I am not paid for clicks or by commission from this sponsor or any other sponsor. Do not copy or use any content or photos from my blog without my written permission. This is original content from www.redpepperquilts.com.