Showing posts with label spool blocks. Show all posts

Tuesday, March 27, 2018

The Finished Scrappy Spool Block Quilt

Scrappy Spool Block Quilt - with link to Spool Block Tutorial (with inset seams | © Red Pepper Quilts 2018 #scrapquilt #spoolblocktutorial #sewingtutorial #redpepperquilts

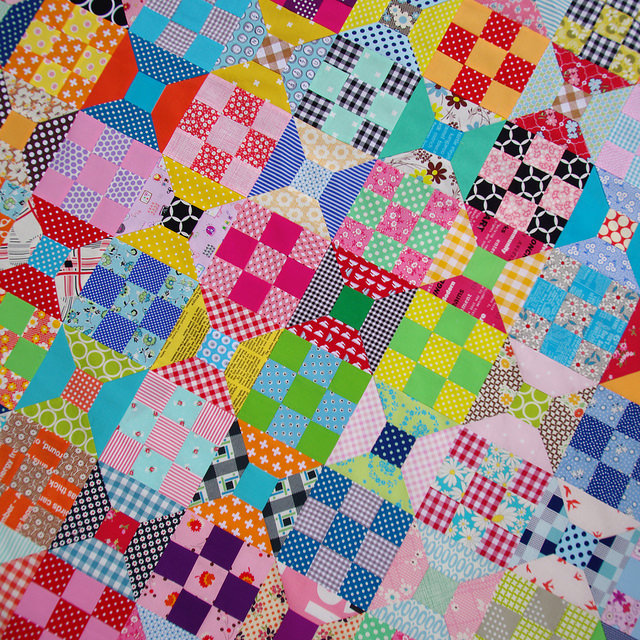
I have lots of photos to share with you of my finished Scrappy Spools Block Quilt. Scrappy quilts continue to be a favorite and I have have loved working on this quilt - from scavenging through my scrap bins and fabric stash, to marking the quarter inch seam allowance on each and every fabric piece, and even sewing the many inset seams. There's something quite relaxing about piecing a repetitive "block" quilt, and once all the blocks are done, so very rewarding.

Scrappy Spool Block Quilt - with link to Spool Block Tutorial (with inset seams | © Red Pepper Quilts 2018 #scrapquilt #spoolblocktutorial #sewingtutorial #redpepperquilts

I have finished this quilt by first ditch stitching the horizontal and vertical seam lines (creating an all over 5 ½ inch quilting grid) and then adding an additional seat of edge to edge diagonal lines that intersect in the center of the Spool blocks.

Scrappy Spool Block Quilt - with link to Spool Block Tutorial (with inset seams | © Red Pepper Quilts 2018 #scrapquilt #spoolblocktutorial #sewingtutorial #redpepperquilts

For the back of the quilt I have used my favorite backing fabric ~ Newsprint from the Dreamer Collection by Carrie Bloomston. I am so glad that this fabric design continues to be available! It complements most of my quilt tops so well, and I like that I can have larger quantities of a fabric on hand that I know will work well with my quilts.

Scrappy Spool Block Quilt - with link to Spool Block Tutorial (with inset seams | © Red Pepper Quilts 2018 #scrapquilt #spoolblocktutorial #sewingtutorial #redpepperquilts

And I have matched it with my signature black/white stripe fabric for the binding ~

Scrappy Spool Block Quilt - with link to Spool Block Tutorial (with inset seams | © Red Pepper Quilts 2018 #scrapquilt #spoolblocktutorial #sewingtutorial #redpepperquilts

QUILT DETAILS
Scrappy Spool Block Quilt
The finished quilt measures 60 inches x 60 inches.
121 Scrappy Spool Blocks
11 rows of 11 Blocks.
Each finished block measures 5 ½ inches x 5 ½ inches.
605 patchwork pieces.
484 inset seams.
100+ different fabrics.
Quilting:
Ditch stitching all vertical and horizontal block seam lines
then adding additional diagonal lines through the center of all blocks.
Thread:
Cotton thread for piecing and quilting.
Batting:
100% low loft cotton batting.

Scrappy Spool Block Quilt - with link to Spool Block Tutorial (with inset seams | © Red Pepper Quilts 2018 #scrapquilt #spoolblocktutorial #sewingtutorial #redpepperquilts

The finished quilt is for sale and is listed in my Etsy Store.

See all of the listing details here:

Scrappy Spool Block Quilt - with link to Spool Block Tutorial (with inset seams | © Red Pepper Quilts 2018 #scrapquilt #spoolblocktutorial #sewingtutorial #redpepperquilts

As always, thank you for stopping by and scrolling through the photos!

Rita
Scrappy Spool Block Quilt - with link to Spool Block Tutorial (with inset seams | © Red Pepper Quilts 2018 #scrapquilt #spoolblocktutorial #sewingtutorial #redpepperquilts

RELEVANT LINKS:
Red Pepper Quilts Etsy Store
Scrappy Spool Block Quilt - Work in Progress
Spool Block Tutorial (with inset seams)


Follow RPQ on:
COPYRIGHT: Do not copy or use any content or photos from my blog without my written permission. This is original content from www.redpepperquilts.com.

Tuesday, March 20, 2018

A Scrappy Spool Block Quilt

Work in Progress
Scrappy Spool Block Quilt - with link to Spool Block with Inset Seams Tutorial | © Red Pepper Quilts 2018 #patchworkquilt #spoolblockquilt #quiltblock #sewingtutorial #redpepperquilts #scrapquilt #quilt #scrapbusterquilt

Another scrappy quilt! I am sure that I am not alone in saying that scrappy makes me crazy happy. I love working from stash and using "all the fabrics", even though it does make for a messy sewing space! Some of the fabrics used were rescued from my scrap bin, but most fabric pieces were cut from stash. And returning fabrics to stash is something I continue to struggle with. There are now numerous piles of fabric awaiting my attention. It is a good creative mess though.

Scrappy Spool Block Quilt - with link to Spool Block with Inset Seams Tutorial | © Red Pepper Quilts 2018 #patchworkquilt #spoolblockquilt #quiltblock #sewingtutorial #redpepperquilts #scrapquilt

Well, I did start this quilt with a limited color palette in mind - I think it was a green/blue theme - but as usual things get out of hand pretty quickly and more colors were added ... deeper shades of blue, a touch of black, lots of yellow, brown, and purple. I have a long running battle with using the color purple but it is slowly becoming a color that I like. Love even.

Scrappy Spool Block Quilt - with link to Spool Block with Inset Seams Tutorial | © Red Pepper Quilts 2018 #patchworkquilt #spoolblockquilt #quiltblock #sewingtutorial #redpepperquilts #scrapquilt

If you study the quilt top closely you'll see that I have included many different fabric prints and designs; from reproduction and floral prints, to modern fabrics and Japanese fabrics. As always fabric stash basics (dots, stripes, checks, gingham) and naturally also text fabrics have been thrown into the mix. How could I not. Some of these fabrics have been part of my stash for a number of years, others are very recent arrivals that were still sitting in (what were) neat piles on my cutting table..

Scrappy Spool Block Quilt - with link to Spool Block with Inset Seams Tutorial | © Red Pepper Quilts 2018 #patchworkquilt #spoolblockquilt #quiltblock #sewingtutorial #redpepperquilts #scrapquilt

I love Spool Blocks! You can easily piece this traditional quilt block with squares and half square triangles however I designed my Spool Block (in EQ8 - quilt design software) with inset seams (Y-seams). I played around with the relative proportions of the center square and the "border" of the block until I was happy and then printed templates for a 5 ½ inch finished Spool Block.

Scrappy Spool Block Quilt - with link to Spool Block with Inset Seams Tutorial | © Red Pepper Quilts 2018 #patchworkquilt #spoolblockquilt #quiltblock #sewingtutorial #redpepperquilts #scrapquilt

QUILT DETAILS
Scrappy Spool Block Quilt
The quilt top measures 60.5 inches x 60.5 inches.
121 Scrappy Spool Blocks
11 rows of 11 Blocks.
Each finished block measures 5 ½ inches x 5 ½ inches.
605 patchwork pieces.
484 inset seams.
100+ different fabrics.

Scrappy Spool Block Quilt - with link to Spool Block with Inset Seams Tutorial | © Red Pepper Quilts 2018 #patchworkquilt #spoolblockquilt #quiltblock #sewingtutorial #redpepperquilts #scrapquilt

Inset seams are not difficult! It does however involve marking seams with a pencil, a lot of back stitching, and stop/start sewing. Each individual block has 8 seams, four of which are inset seams. A total of 484 inset seams! I think I've got these inset seams down pat now. All of my blocks have been machine pieced. (See here for a Spool Block Tutorial with Inset Seams).

Scrappy Spool Block Quilt - with link to Spool Block with Inset Seams Tutorial | © Red Pepper Quilts 2018 #patchworkquilt #spoolblockquilt #quiltblock #sewingtutorial #redpepperquilts #scrapquilt

Ready for basting and quilting.

Thank you for stopping by,
Rita

Scrappy Spool Block Quilt - with link to Spool Block with Inset Seams Tutorial | © Red Pepper Quilts 2018 #patchworkquilt #spoolblockquilt #quiltblock #sewingtutorial #redpepperquilts #scrapquilt

RELEVANT LINKS:
The Finished Scrappy Spool Block Quilt 
Spool Block with Inset Seams Tutorial
Spool Block and Nine Patch Quilt - September 2014
More RPQ Quilt Projects with Inset Seams:
Scrappy Bow Tie Quilt - August 2016
Kansas Dugout Quilt (and Tutorial) - April 2014
Pink Flamingo Hexagon Quilt (and Tutorial) - January 2017
More RPQ Scrap Busting Quilts

Scrappy Spool Block Quilt - with link to Spool Block with Inset Seams Tutorial | © Red Pepper Quilts 2018 #patchworkquilt #spoolblockquilt #quiltblock #sewingtutorial #redpepperquilts #scrapquilt


Follow RPQ on:
COPYRIGHT: Do not copy or use any content or photos from my blog without my written permission. This is original content from www.redpepperquilts.com.

Tuesday, September 23, 2014

Spools and Nine Patch Quilt

A Finished Quilt.
Spools and Nine Patch Quilt | Red Pepper Quilts

As promised a picture post of my finished Spools and Nine Patch Quilt. I do love how it has turned out; I love the bright colors, that the fabrics were pulled entirely from stash, and whilst in progress unplanned changes were made - adding the alternating nine-patch block -  that affected the final quilt layout and added so much interest to the design.

Spools and Nine Patch Quilt | Red Pepper Quilts

As usual the quilting has added minimal visual detail but that is not to say that this quilt is lightly quilted. I have ditch stitched all vertical and horizontal seam lines, effectively creating an overall 2 inch grid of intersecting straight lines, and thereby adding a hint of texture. I generally use a low loft cotton batting (Matilda's Own brand) which leaves the quilt with a lovely soft drape and a supple finish.

Spools and Nine Patch Quilt | Red Pepper Quilts

For the back of the quilt I have used a single red polka dot fabric on a white background from the Delilah collection by Tanya Whelan. This classic fabric has been in my stash for a while and I must have purchased close to a bolt of it as I have used it as a backing fabric a number of times.

Spools and Nine Patch Quilt - binding | Red Pepper Quilts

And I have finished the quilt with a black/white stripe fabric and machine stitched binding. I am consistent and predictable.

Spools and Nine Patch Quilt | Red Pepper Quilts

This quilt was listed for sale in my Etsy Store. It has already sold. 

Spools and Nine Patch Quilt | Red Pepper Quilts

RELEVANT LINKS:
Spool Block and Nine Patch Quilt TUTORIAL
Spool Block and Nine Patch Quilt - Work in Progress
More scrap and stash busting projects
Spools and Nine Patch Quilt | Red Pepper Quilts
Thank you for stopping by,
Rita

Pin It!
Follow RPQ on:
COPYRIGHT: Do not copy or use any content or photos from my blog without my written permission. This is original content from www.redpepperquilts.com.

Thursday, September 18, 2014

Spool and Nine Patch Quilt ~ A Tutorial and Templates

Two traditional quilt blocks ~ a Spool Block and a Nine Patch Block ~ are all that are required to make this quilt; neither block is difficult to piece however I thought I would share with you a tutorial, and provide templates for those of you who prefer not to draft your own.
Spool and Nine Patch Block ~ TUTORIAL | RED PEPPER QUILTS
Click on any Image for LARGER view.
Let's get started.

SPOOL BLOCK TUTORIAL

Fabric Requirements for each Spool Block:
1 center square 2.5 inches x 2.5 inches
2 contrasting fabrics for side pieces ~ each fabric piece measuring 12.5 inches x 2.5 inches
(which makes this block Jelly Roll friendly).

Step 1
Download, print and carefully cut out your templates or draft your own templates for a 6 inch finished block.
Spool Block Templates | Red Pepper Quilts

To assist in cutting the fabric pieces for a 6 Inch finished Spool Block I have made templates available for purchase (pdf file) from my Pattern Store:


The pdf file is available for immediate download and includes Spool Block templates for a 6 inch finished block, a full color quilt layout, as well as a black/white line drawing of alternating Spool and Nine Patch blocks with which you can experiment and play with your own color palette.

Step 2
For each Spool Block you will need one center square and four side pieces (two the same pieces of each side fabric chosen ~ you can use solid fabric, printed fabric, or a combination of both).

Spool and Nine Patch Block ~ TUTORIAL | RED PEPPER QUILTS
Step 3
Spool and Nine Patch Block ~ TUTORIAL | RED PEPPER QUILTS
Mark (on the wrong side of the fabric) a 1/4 inch seam allowance along three sides of the fabric, as pictured above. (I use a 2B pencil with a 7mm lead as it is soft enough to lightly mark the fabric without breaking the lead).

Step 4
Spool and Nine Patch Block ~ TUTORIAL | RED PEPPER QUILTS

Align and center the first side fabric to be sewn on top of the center square (right sides together). There is no need to mark the center square as you can easily see if you have correctly centered the fabric by the matching the size of the opposite corners. With a short length stitch start sewing where the lines intersect and stop at the next intersecting point. Back-stitch at the start and end of the stitching line to lock the stitches in place.

Step 5
Spool and Nine Patch Block ~ TUTORIAL | RED PEPPER QUILTS

Repeat step 4  for the fabric piece on the opposite side of the center square.

Spool and Nine Patch Block ~ TUTORIAL | RED PEPPER QUILTS

Finger press the seams away from the center square. Don't use an iron at this stage.

Step 6
Spool and Nine Patch Block ~ TUTORIAL | RED PEPPER QUILTS

The third fabric piece is going to fit right in between the first two pieces. Line up the folded edge of the first side piece (the purple fabric) with the starting point (where the pencil lines intersect) of this third piece of fabric. Do not start stitching in the seam allowance of the purple fabric. Stitch one or two stitches, back stitch - and continue on till the next intersecting point.

Spool and Nine Patch Block ~ TUTORIAL | RED PEPPER QUILTS

Stop stitching at the point where the pencil marks intersect but again do not stitch into the seam allowance of the purple fabric.  If you have accidentally stitched too far use a seam ripper to undo those stitches.

Your block now looks like this. Finger press the seams away from the center square.
Spool and Nine Patch Block ~ TUTORIAL | RED PEPPER QUILTS
Step 7
Spool and Nine Patch Block ~ TUTORIAL | RED PEPPER QUILTS
We are now ready to sew the final four side seams of the Spool Block. With the right side of the block facing your fold over the center square diagonally in half (wrong sides together). The side seams that need to be sewn will lie flat together ready for sewing.

Spool and Nine Patch Block ~ TUTORIAL | RED PEPPER QUILTS

Start stitching at the intersecting point and sew all the way to the end. Back stitch at start and end to lock stitches.

Work your way around the block by re-folding the center square and sewing all four of the side seams. Your block will then look like this:

Spool and Nine Patch Block ~ TUTORIAL | RED PEPPER QUILTS

Step 8 Press your block.

Spool and Nine Patch Block ~ TUTORIAL | RED PEPPER QUILTS
Front and Back of Spool Block
Spool Block measures 6.5 inches x 6.5 inches (including seam allowances).

Press two opposing center seams in towards the center square and the other two seams away from the center square. The points where the fabrics come together will simply twist open. Gently press.

NINE PATCH BLOCK TUTORIAL

Fabric Requirements for each Nine Patch Block:
Nine 2.5 inch squares in two contrasting colors
Spool and Nine Patch Block ~ TUTORIAL | RED PEPPER QUILTS
9 squares
4 solid fabric squares :: 5 printed fabric squares
Arrange your squares in three rows of three ~
Spool and Nine Patch Block ~ TUTORIAL | RED PEPPER QUILTS

Using a quarter inch seam allowance sew squares together into rows of three squares. Then sew rows together. Press seams as desired. These seams won't require nesting or matching with Spool Blocks so direction of these seams is not important in this instance.

Spool and Nine Patch Block ~ TUTORIAL | RED PEPPER QUILTS
Front and Back of the nine patch block.
Nine Patch Block measures 6.5 inches x 6.5 inches (including seam allowances).

Arrange your blocks by alternating a Spool Block with a Nine Patch Block. Using a quarter inch seam allowance sew blocks together in rows. Press seams for each alternate row in opposing direction. Then sew rows together. Press final seams open or one side.
Spool and Nine Patch Block ~ TUTORIAL | RED PEPPER QUILTS
50 Spool Blocks + 50 Nine Patch Blocks
POINTS TO REMEMBER:
  • Reducing your stitch length will help you to stop on or before the point where lines intersect.
  • Back stitch at the start and end of all seam lines to lock stitches.
  • If you have puckers on the front of your block it is usually because your have stitched too far and into the seam allowance. It is not too late to fix this. Simply turn your block over and unpick those extra stitches.
  • Take your time to press blocks carefully.
  • Print templates ACTUAL SIZE.  Do not reduce or scale to fit.
If you have any questions please don't hesitate to ask by leaving a comment, and I will explain/clarify as required.

Next up ~ a picture blog post of the finished Spool and Nine Patch Quilt.

Happy Stitching!
Rita

Spool and Nine Patch Quilt - TUTORIAL | Red Pepper Quilts

RELEVANT LINKS:
Spool Block Templates - RPQ Pattern Store
Spool Block and Nine Patch Quilt - Work in Progress
Spool Block and Nine Patch Quilt - the Finished Quilt
More RPQ Tutorials

Pin It!
Follow RPQ on:
COPYRIGHT: Do not copy or use any content or photos from my blog without my written permission. This is original content from www.redpepperquilts.com.