Showing posts with label curves. Show all posts

Tuesday, September 25, 2018

The Freewheeling Single Girl Quilt

Freewheeling Single Girl Quilt | Pattern by Denyse Schmidt | © Red Pepper Quilts - September 2018

There's a sew-along happening! The Freewheeling Single Girl Quilt Sew-Along is hosted by Sewtopia, The Next Stitch and Denyse Schmidt (Denyse is the designer of this timeless version of a traditional Double Wedding Ring quilt). This pattern and sew-along is for the updated free-wheeling version of the original Single Girl Quilt pattern and includes guidelines for improvising the arcs for each block.

Freewheeling Single Girl Quilt | Pattern by Denyse Schmidt | © Red Pepper Quilts - September 2018

The Single Girl Quilt has been on my quilt bucket list for several years, and more recently (in the last 3 months) I had purchased both the Freewheeling Single Girl Quilt pattern and templates. So when the sew along was announced I was ready to go. It was the nudge I needed to just do it.

Freewheeling Single Girl Quilt | Pattern by Denyse Schmidt | © Red Pepper Quilts - September 2018

Now, free-wheeling (improvised piecing) is not exactly my preferred sewing style, and the 36 arcs required for this quilt were pieced over a one week period. Not that I struggled with the pattern or the instructions. In fact, it was easy, and together with the templates, all the blocks came together so well.  It is more that I like to measure .... everything. In the end, having to let go of creating identical pieced arcs was freeing, and I could not be happier with the finished quilt.
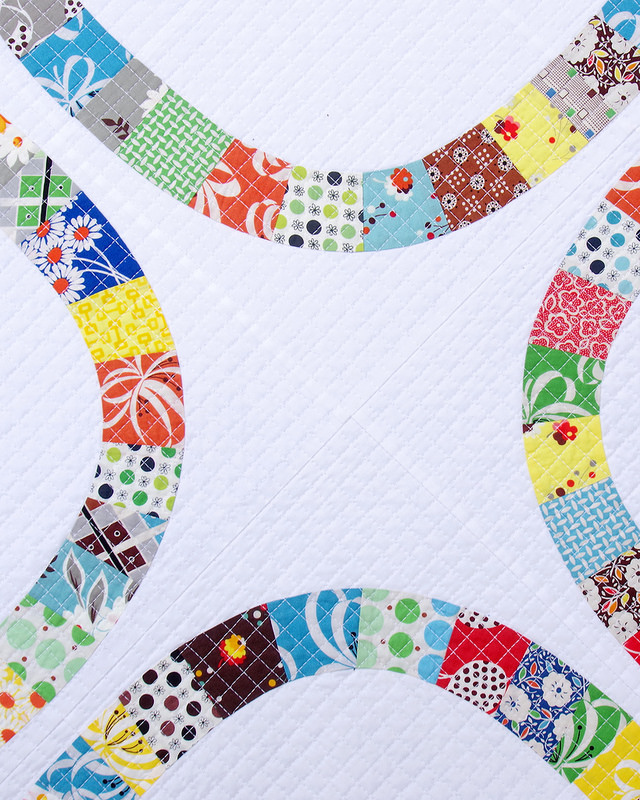
Freewheeling Single Girl Quilt | Pattern by Denyse Schmidt | © Red Pepper Quilts - September 2018

I have used two of my most loved fabric collections to piece the arcs: Flea Market Fancy and Katie Jump Rope. Both these collections are by Denyse Schmidt, and both have been reprinted in more recent years. Many of the fabric pieces used are from the original collections and in color ways that are now very hard to find. It was a joy working with these long stashed fabrics, and it seemed appropriate to cut into them for this quilt!

Freewheeling Single Girl Quilt | Pattern by Denyse Schmidt | © Red Pepper Quilts - September 2018

I have quilted the quilt with an all over 1/2" grid of intersecting quilting lines, and I have used a heavier weight thread (Aurifil 28wt - the grey spool) for the top thread. The heavier/thicker thread gives the stitch a lovely definition. Yes, the quilting took forever; hours and hours of mindless stitching (and almost a whole spool of top thread - 750 meters), but the texture is so worth it.

Freewheeling Single Girl Quilt | Pattern by Denyse Schmidt | © Red Pepper Quilts - September 2018
Click on any image for a larger view.

For the back of the quilt I have used a single floral/ribbon print from the reprinted Katie Jump Rope collection. I love this print and was happy to have sufficient yardage on hand to use for the quilt back.

Freewheeling Single Girl Quilt | Pattern by Denyse Schmidt | © Red Pepper Quilts - September 2018

And for the binding I was rather thrilled (and surprised) to find a half yard of stripe fabric from the original Katie Jump Rope collection in my stash. The green/black/white/ stripe adds a nice contrast finished edge to the quilt. I also decided I needed to spend some extra time with the quilt and hand slip stitched the binding to the quilt back; time to reflect and enjoy the make journey.

Freewheeling Single Girl Quilt | Pattern by Denyse Schmidt | © Red Pepper Quilts - September 2018 #modernquilt #freewheelingsinglegirlquilt #singlegirlquilt #patchworkquilt

QUILT DETAILS
Freewheeling Single Girl Quilt
Finished quilt measures 62.5 inches x 62.5 inches.
Pattern :
Freewheeling Single Girl Quilt by Denyse Schmidt
36 quarter circle arc blocks.
9 complete circles.
Fabrics Used:
Flea Market Fancy by Denyse Schmidt.
Katie Jump Rope by Denyse Schmidt.
Robert Kaufman Kona Cotton in White.
THREAD for quilting:
Aurifil 28wt thread (the gray spool) for quilting:
 (28wt top thread - 40wt thread in the bobbin).
Batting:
Low loft cotton batting - bleached white.

Freewheeling Single Girl Quilt | Pattern by Denyse Schmidt | © Red Pepper Quilts - September 2018

Of course, it is not too late to join the Freewheeling Single Girl Quilt Along! It has only just begun and it is a no-pressure and at your leisure project, plus both Sewtopia and The Next Stitch offer useful hints/tips via email and Instagram videos for successful completion. For all the sew along details, pattern, and acrylic templates (although the acrylic templates are not a requirement, they sure are useful!) please check out the following:
Freewheeling Single Girl Quilt | Pattern by Denyse Schmidt | © Red Pepper Quilts - September 2018

And so it goes ... another quilt ticked off my bucket list. I could not be more pleased with this quilt. Thank you for scrolling through the many photos. Taking photos of a quilt with so much white fabric is tricky and I thought that as these photos turned out ok, I might as well show them!

Thank you for stopping by,
Rita

Freewheeling Single Girl Quilt | Pattern by Denyse Schmidt | © Red Pepper Quilts - September 2018

RELEVANT LINKS:
Sunday Stash - Flea Market Fancy Reprint (February 2012)
Sunday Stash - Katie Jump Rope (December 2015)
For more Freewheeling Single Girl Quilt inspiration check out the Instagram hashtag:

Follow RPQ on:
COPYRIGHT: Do not copy or use any content or photos from my blog without my written permission. This is original content from www.redpepperquilts.com.

Tuesday, April 3, 2018

Apple Core Quilt - Work in Progress

Apple Core Quilt - Machine Pieced - Work in Progress | © Red Pepper Quilts 2018 #redpepperquilts #applecorequilt #machinepieced #sewingcurves #traditionalquilt

Since finishing my Mandolin Quilt - an English Paper Piecing project - I have been on a quest to get started on my next slow sewing project. It didn't take long to find the Nickels and Dimes Quilt Pattern by Everyday Quilts which is written for hand piecing (not EPP). Nickels and Dimes is a vintage inspired quilt pattern based on the traditional Apple Core block.

Apple Core Quilt - Machine Pieced - Work in Progress | © Red Pepper Quilts 2018
Click on any image for a larger view.

I was keen to try my hand again at hand piecing, although admittedly my hand piecing skills still require some work and those curved seams might not be ideal for a beginner hand piecer. Yet I was determined to give a go.

Apple Core Quilt - Machine Pieced - Work in Progress | © Red Pepper Quilts 2018

The pattern includes a set of 2 acrylic templates; one for cutting out the half apple core units, and one for tracing a ¼ inch seam line onto the fabric pieces. The templates are fabulous and all of my fabric pieces were cut by tracing around the outside of the template with a tiny (18mm) rotary cutter, and then marked with a standard grey lead pencil.

Apple Core Quilt - Machine Pieced - Work in Progress | © Red Pepper Quilts 2018

I spent a lot of time pulling fabric from stash and cutting one or two pieces from each fabric, cutting enough fabric pieces to make a quilt top, then marking each piece .... but just two hand pieced blocks into the project I began to wonder if I could perhaps machine piece this quilt. Testing commenced immediately, and to my delight I quickly figured out a way to proceed, pressing seams in such a way that all seams would nest when my blocks (of 4 whole Apple Core units) were ready to be sewn together into a quilt top.

Apple Core Quilt - Machine Pieced - Work in Progress | © Red Pepper Quilts 2018

It was still slow going by machine, sewing one curved seam at a time, all without a single pin. I am not a pinner, and prefer to sew curved seams without pinning. It takes practice and you eventually get a feel for how the fabric feeds and lies in the curve, with some fabrics handling with more ease, and others requiring more persuasion to fall into place. I always sew curved seams with the concave fabric piece on top, thus requiring much "flipping over" of the blocks as they were pieced, and then the quilt top itself as the blocks were sewn into rows, and rows were sewn together.

Apple Core Quilt - Nickels and Dimes Quilt - Work in Progress | © Red Pepper Quilts 2018 #redpepperquilts #applecorequilt #patchworkquilt

QUILT DETAILS
Apple Core Quilt
Quilt top measures 51 inches x 51 inches.
144 Apple Core Units
sewn into 36 blocks of 4 Apple Core Units
288 patchwork pieces.
200 different quilting cottons.
Machine pieced.

Apple Core Quilt - Nickels and Dimes Quilt - Work in Progress | © Red Pepper Quilts 2018 #applecorequilt #redpepperquilts #patchworkquilt #vintageinspiredquilt

So much for my slow sewing project! But I am glad I pushed ahead and finished piecing this quilt top by machine. I love how it turned out, and I adore the curvy quilt edges almost as much as the quilt top itself! The easy way forward from here would be to square up the quilt edges (trim off all those pretty curves) but I am keen to preserve the curvy edges and work with bias binding to finish the quilt. I rarely make bias binding and have a mental block about the best way to make bias binding - I have watched YouTube videos that involve making a tube, and for some reason I can't get my head around the process, but I am determined .... I can do this!

Apple Core Quilt - Nickels and Dimes Quilt - Work in Progress | © Red Pepper Quilts 2018
Apple Core Quilt - Nickels and Dimes Quilt - Work in Progress | © Red Pepper Quilts 2018 #patchwork #quilt #applecorequilt #vintageinspiredquilt
Apple Core Quilt - Nickels and Dimes Quilt - Work in Progress | © Red Pepper Quilts 2018

More soon,
Rita
Apple Core Quilt - Machine Pieced | © Red Pepper Quilts 2018 #applecorequilt #patchworkquilt #vintageinspiredquilt #machinepieced

RELEVANT LINKS:
Templates from the Nickels and Dimes Pattern
by Everyday Quilt - Sandra Boyle.
More RPQ Quilt with curved machine piecing:
Chambray Flowering Snowball Quilt - December 2017
A Piece of the Pie Quilt - July 2014
A Drunkard's Path Quilt - June 2014


Follow RPQ on:
COPYRIGHT: Do not copy or use any content or photos from my blog without my written permission. This is original content from www.redpepperquilts.com.

Thursday, July 6, 2017

99 Squircles ~ A Quilt in Progress

99 Squircles Quilt | Work in Progress | © Red Pepper Quilts July 2017

It was time for some serious scrap busting and this quilt block has been on my mind for some time. The block is inspired by a vintage quilt ~ The Elizabeth Chapman Coverlet dating back to 1829 ~ which features a rectangular panel in the center of the quilt surrounded by a variation of the Drunkard's Path Block. 

99 Squircles Quilt | Work in Progress | © Red Pepper Quilts July 2017

The block is neither a circle nor a square, hence the reason I am calling it a Squircle block, and while the original blocks (in the Chapman Coverlet) were English Paper pieced, I have also come across reproductions of this block using applique. However, I was keen to machine piece my blocks, using templates to cut out my fabric pieces.

99 Squircles Quilt | Work in Progress | © Red Pepper Quilts July 2017

To draw up my paper templates I turned to EQ7 (quilt design software). I am no EQ7 expert and admittedly spent much more time thinking about how I would go about drafting the block in EQ7, then the 3 minutes it took to actually draw up and print out the templates!

99 Squircles Quilt | Work in Progress | © Red Pepper Quilts July 2017

Once the templates were ready the fabric cutting could begin. I pieced a few test blocks to see if I could manage the short but rather tight curve by machine. Not all went well at first as every third block or so would have a small tuck in the curved seam. I tried clipping the seam after piecing and some persuasive pressing with a warm steam iron without success, and then I had a light bulb moment. What if I clipped the (concave) curved edge of the fabric before piecing? That worked! The clipped edge allowed me to easily manipulate the fabric and work it around the curve as I slowly stitched. No tucks, no pleats.

99 Squircles Quilt | Work in Progress | © Red Pepper Quilts July 2017

I made 100 Squircle Blocks, that's 400 Drunkard's Path variation blocks each measuring 3 1/2 inches x 3 1/2 inches. They are small units! At the last minute I decided to sew the the quilt together as a rectangle - 11 rows of 9 blocks - rather than a square quilt - 10 blocks x 10 blocks. The quilt top measures 54 inches x 66 inches.

99 Squircles Quilt | Work in Progress | © Red Pepper Quilts July 2017

QUILT STATS
99 Squircles Quilt
Quilt top measures 54 inches x 66 inches.
Each finished 4-patch Squircle Block measures 6 inches x 6 inches.
396 Drunkard's Path Variation Blocks.
Each finished Drunkard's Path Block measures 3 inches x 3 inches.
792 patchwork pieces.
250+ different quilting fabrics.

99 Squircles Quilt | Work in Progress | © Red Pepper Quilts July 2017

I have used lots of different designer quilting cottons, many which I am sure you will recognise. And of course, if you've stopped by here before, you may already know that I am not a pinner, and not a single pin was used to piece this quilt top. (See here for a tutorial on how I piece curved seams without pins). I am also surprised I still have all my fingers. Using a tiny rotary cutter to trace around paper templates, especially templates with tight curves, is precarious and probably less than ideal. But I made it through unscathed! Happy, scrappy, days.
99 Squircles Quilt | Work in Progress | © Red Pepper Quilts July 2017

99 Squircles Quilt | Work in Progress | © Red Pepper Quilts July 2017

Pin It!
Follow RPQ on:
Follow
COPYRIGHT: Do not copy or use any content - this specifically includes all photos - from my blog without my written permission. This is original content from www.redpepperquilts.com.

Thursday, November 3, 2016

Flowering Snowball Quilt 2

Work in Progress.
Flowering Snowball Quilt 2 - Work in Progress | © Red Pepper Quilts

I loved piecing the Flowering Snowball blocks for my first Flowering Snowball Quilt so much that as soon as I had finished that quilt I ordered a new set of templates. A set of smaller templates to piece a finished 6" finished block. I wondered at the time if I could actually pull that off ... 

Flowering Snowball Quilt 2 - Work in Progress | © Red Pepper Quilts

Well, yes I can. After a few test blocks that turned out surprisingly good I forged ahead with this quilt top. The pieces are small and the curve is a little tighter but all of the cutting and sewing principles are exactly the same. 

Flowering Snowball Quilt 2 - Work in Progress | © Red Pepper Quilts

This is such a versatile block! The potential to change the design by the placement of fabric and the use of color is limited only by imagination. For this quilt I have chosen to go with a scrappy look and all blocks are the same; low volume prints for the four "corners" of the block and a contrast printed/color fabric for the "petals" of the block. No further intricate planning was required for this layout.

Flowering Snowball Quilt 2 - Work in Progress | © Red Pepper Quilts

Many of these small fabric pieces were rescued from my scrap bin (all of which took much longer than anticipated!) and I have also used fabrics from stash. Again, no pins (nor basting glue) were used to piece the individual blocks and the same can be said for piecing the blocks into a quilt top.

Flowering Snowball Quilt Block - pressing seams
Flowering Snowball Quilt Block
- pressing seams
I do however like to nest my seams and I was able to nest all seams by pressing the seams for all blocks in exactly the same way. I did not clip any of the curved seam allowances and with a warm and gentle steam iron the blocks pressed up very nicely.

Flowering Snowball Quilt 2 - Work in Progress | © Red Pepper Quilts

QUILT STATS
Flowering Snowball Quilt 2
Quilt top measures 48 inches x 60 inches.
A total of 80 Flowering Snowball Blocks.
(10 rows of 8 blocks).
Each finished block measures 6 inches x 6 inches.
720 patchwork pieces.
That tiny black center square measures 1/2" x 1/2".
Flowering Snowball Quilt 2 - Work in Progress | © Red Pepper Quilts

Now ready for basting and quilting!

More soon.
Rita
Flowering Snowball Quilt 2 - Work in Progress | © Red Pepper Quilts

RELEVANT LINKS:

Pin It!
Follow RPQ on:
COPYRIGHT: Do not copy or use any content or photos from my blog without my written permission. This is original content from www.redpepperquilts.com.