


Two days of continuous rain in Melbourne was the springboard for my next project. I needed an infusion of color in what was otherwise a dull week (in terms of weather only!). Bring out all the colorful fabric and make a whole bunch of half squares triangles and soon the possibilities are endless.


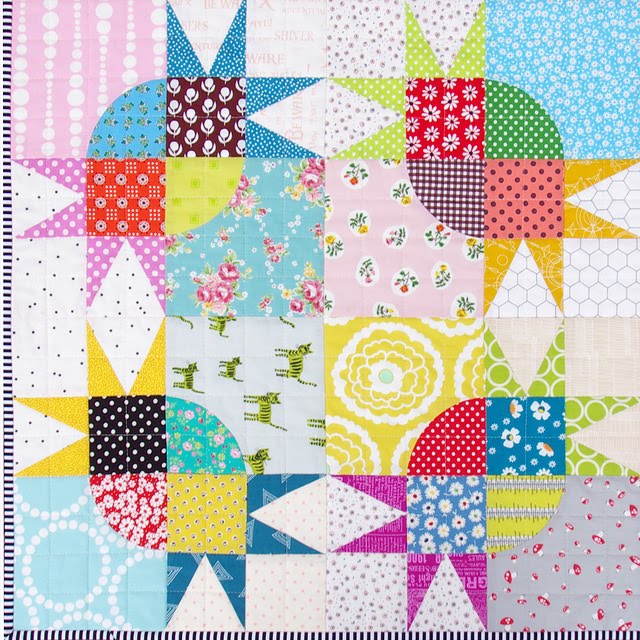
I have made my half square triangle units for this project by contrasting dark (saturated color fabric) with a light (low volume) fabric, with most of the low volume fabrics being a black/white print. I was pleasantly surprised to see how many of my stashed black/white fabrics were suitable for this project although I did need to expand upon my initial fabric selection by including shades of grey.

For the quilt layout I have arranged the half square triangle units by color, radiating out from the center of the quilt in value and around the quilt in color temperature - cool (purple, blue, green) versus warm (yellow, red, orange), overlapping and blending the color groupings without strictly adhering to color theory principles.

Working with these glorious colors, combined with the repetitive tasks involved in piecing these units - including the trimming - certainly brightened my week. I have already made good progress on this quilt and hope to have more to show you soon.

PROJECT DETAILS:
- Half Square Triangle Units (HST) - measuring 4.5 inches x 4.5 inches including seam allowances.
- Fabric requirements: 5.5 inch squares in a rainbow of colors contrasted with a 5.5 inch square of light fabric.
- Piece HST units using Step 1 to 3 in this HST tutorial. Trim each unit to measure 4.5 inches x 4.5 inches.
- Arrange HST units in color groupings, mix and blend as you like. When you are happy with your layout sew your units together into a quilt top.
Happy sewing,
Rita

Rita
RELEVANT LINKS:


Thank you for all of your tutorials. I've really been enjoying you sharing them all and am soaking up the different blocks that have been out for ages and that I am just lately becoming acquainted with.
ReplyDeleteSo fun to look at - lovely fresh Colors :)
ReplyDeleteYour colors are always so fabulous!
ReplyDeleteso pretty and bright!!
ReplyDeletelove all the contrast on this one -- it's stunning
ReplyDeletesuch a pretty combination, Rita... Thank you for the tutorial :) I am in the middle of making ohio block quilt base on your last tutorial .. its really fun making .... will show you my quilt when I finished .. :))
ReplyDeleteMore loveliness!
ReplyDeleteOh this is so pretty. When you make your HST's do you press your seams open? If not, could you share how you deal with/press the seams when joining multiple triangles? Pretty please?
ReplyDeleteI pressed my seams for each HST unit together to the darker fabric (not open). I then arranged all of the units and sewed together into rows, pressing seams in alternate direction for every row so that they could nest together. Then I sewed the rows together. Those long seams were also pressed either up or down. The only seam that I pressed open was the final center seam (where the HST units meet in the middle of the quilt). Using a steam iron will help with pressing your seams. Be a little firm when pressing. I hope that answers your question. Rita
DeleteLovely! All the colors of spring!
ReplyDeleteJust gorgeous Rita. Your colour selection is fantastic. Very fresh. I look forward to seeing this quilt when it's completed.
ReplyDeleteOh my gosh I love it!
ReplyDeleteThat's a stunner. Do you cut all the HSTs yourself? What's your favorite way of making HSTs?
ReplyDeleteHi Ella - I choose and cut, and sew all of my HST's (and make all of my quilts) myself. I use step 1 to 3 in this tutorial to make HST units:
Deletehttp://www.redpepperquilts.com/2010/04/hour-glass-block-tutorial.html
This method works well for me.
Rita
Oops...got so distracted by pretty that I missed the HST tutorial link...
ReplyDeleteVery pretty. I have to ask...do you have little elves that do all the cutting for you? I did one block of the Kansas Dugout and it took me about an hour start to finish. I do not know how you accomplish so much beautiful work each week. Thanks for all the wonderful project ideas.
ReplyDeleteHi Kathy - no helpers here! It is time consuming, especially making Kansas Dugout Blocks. What seemed to work well is to cut fabric in batches - say cut fabric for 10 blocks at a time - then sit and sew. This made it feel like the process was a little quicker, and like I was making progress.
DeleteRita
Hi Rita- After trying that block I was hoping to get a crack at the quilt on etsy ... But some lucky person got there before I did. I can't wait to see how this one turns out. It looks perfect for spring. Thanks again for all the hard work you put not only into the pieces you create but the new and fun posts you write for all of us to enjoy and learn from. You make it look so effortless, but maintaining such an interesting and current blog is a big job in and of itself. I find myself looking forward to see what new and interesting project you have each week. You are simply amazing.
Deletethanks rita! i saw this on instagram and instantly came to my computer to 'pin" this. so excited to try!
ReplyDeleteThanks Cynthia :-)
DeleteIt's beautiful! All the colors are just perfect with each other. ;p
ReplyDeleteA new quilter here marveling at your absolutely perfect points.. I'm struggling with that and squaring up
ReplyDeleteHi Debbie - thank you for stopping by. Don't be too concerned with perfect points, they will come with experience. Focus on cutting carefully, sewing accurate 1/4 inch seams and it will start to happen for you.
DeleteWith regard to squaring up - do you mean the quilt? If so, I use a large ruler 14" x 14" to square up the corners of my quilts before binding. The larger the ruler the better really. I hope that is helpful.
Rita
Love this! So pretty and happy!
ReplyDeleteOh, I SO need to try this one. We went from 80 yesterday to 32 and snowing right now and I need bright, warm color too! Your quilt is simply stunning! Cindy
ReplyDeleteBeautiful and looks so crisp and colorful!
ReplyDeleteso many different fabrics here to see and admire in this lovely quilt
ReplyDeleteSo lovely ~ you do have a way of putting fabrics together! Thanks for the instructions too!
ReplyDeleteI really like the bright and pretty colors, but I have been looking closely at the low volume prints and they are fantastic. What a great collection of black and white prints.
ReplyDeleteI would love to see your stash. It must be amazing. How much of a fabric do you usually buy? Your fabrics and design are always so very fresh and crisp. I'm also curious how you light your photos as they are always very bright and sharp.
ReplyDeletejust beautiful. And ditto to everything Anne (above) said. :)
ReplyDeletethe awesomeness is melting my face! :D
ReplyDeleteMe, too, Anne!!!
ReplyDeleteLove, love, love your quilts!
ReplyDeleteFun quilt!!!
ReplyDeleteI love the clean, crispness of your colours - beautiful Quilt. I am intrigued with your machine stitched binding - sounds terrifying but will have to give it a go! Thank you for the link to your tutorial
ReplyDeleteI made lots of hst's with purples, all different shades of purples, but the whites are not all the same. There are so many designs but it's for an 11 yr. old so I want it modern. I will give this a try. You are my inspiration. Like the Righteous Brothers, 'you are my soul and my inspiration'.
ReplyDelete