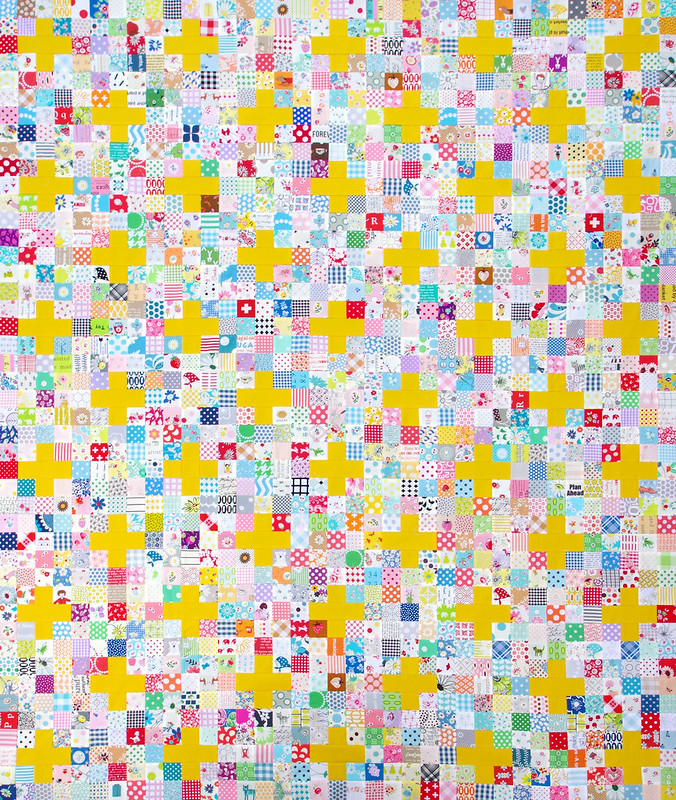
My first machine pieced quilt for the year! It's been so long since I switched on the trusty Juki but having plenty of home time and a significant fabric stash meant there was no excuse for lounging around. Although I did plenty of that too.
Scrap quilts are my favorite, especially simple designs pieced from small patches of fabric. I have a shoe box full of 2 inch squares that I add to regularly. Whenever I cut fabric for a quilt and have a small scrap of fabric leftover, I cut that piece into 2 inch squares and add it to the shoe box. And if I am using a fabric that lends itself to fussy cutting, I fussy cut a few additional 2 inch squares and add those as well. I think you'll see quite a few fabrics here that I have used before, and fabrics that you too may have in your stash.
BASIC SCRAPPY CROSS QUILT TUTORIAL
This quilt is inspired by a vintage quilt that was more than likely hand pieced. To machine piece this quilt top I broke down the design into simple repeats and a block based layout. This quilt is made from just two blocks that are alternated throughout: Block A on the left and Block B on the right. It doesn't get any easier than that. The blocks are sewn together in horizontal rows of four squares each.
This quilt is inspired by a vintage quilt that was more than likely hand pieced. To machine piece this quilt top I broke down the design into simple repeats and a block based layout. This quilt is made from just two blocks that are alternated throughout: Block A on the left and Block B on the right. It doesn't get any easier than that. The blocks are sewn together in horizontal rows of four squares each.
I like to press seams together to one side, rather than open. If you consistently follow the arrows as indicated below all of your seams will nest when you sew the individual blocks AND when you sew the blocks together into a quilt top. So, for row 1 of Block A press seams to the right, for row 2 of block A press seams to the left etc.
Click on any image for a larger view.
TOTAL BLOCKS REQUIRED
Block A - 50*
Block B - 49
FABRIC REQUIREMENTS
Solid Fabric: 3/4 yards
Solid Fabric: 3/4 yards
Printed Fabric: 1415 two inch squares
*For block A: rather than cut 3 individual squares of solid fabric,
I have cut a rectangle piece measuring 5 inches x 2 inches.
*For block A: rather than cut 3 individual squares of solid fabric,
I have cut a rectangle piece measuring 5 inches x 2 inches.
Once you've made the required number of blocks lay out your blocks starting with Block A and alternating Block A and Block B throughout (eleven horizontal rows of 9 blocks each). Sew blocks together into rows and then sew long rows together into a quilt top.
The final step to complete the quilt top is to add an additional row of squares along the top edge of the quilt top and the left hand side of the quilt top so that the design is symmetrical - see the rows below as indicated by the arrows (pictured above).
Quilt top measures 54 inches x 67.5 inches.
Solid fabric: Robert Kaufman Kona Cotton in Grellow.
Solid fabric: Robert Kaufman Kona Cotton in Grellow.
Started: May 2020
Finished: June 2020
I have loved piecing this quilt top together. It's been a long time since I have enjoyed sitting at the machine and I was very pleased to feel so comfortable and back in the zone. I have missed it.
This is a great "leaders and enders" project if you normally used this technique to start and end your seams. I don't use a scrap of fabric to start and end my sewing, but I can see how that would be of benefit if you're having bird's nest issues, or fabric getting jammed into the bobbin area. I do also like the idea of working on a second project at the same time.
I have made good progress on this quilt. It has been basted and quilted. I have even added the binding, but the hand slip stitching of the binding is yet to be done.
Thank you for stopping and browsing through the photos. If you have any questions please regarding the tutorial please let me know in the comments and I will reply there.
Rita
RELEVANT LINKS
More Red Pepper Quilts Tutorials
More RPQ Scrappy Quilts:
Scrappy Irish Chain Quilt - July 2015
Scrappy Irish Chain Quilt - November 2017
Japanese Stash Buster Quilt - November 2019
Economy Block Quilt - August 2013
Scrappy Irish Chain Quilt - November 2017
Japanese Stash Buster Quilt - November 2019
Economy Block Quilt - August 2013
COPYRIGHT: Do not copy or use any content or photos from my blog without my written permission. This is original content from www.redpepperquilts.com.


