


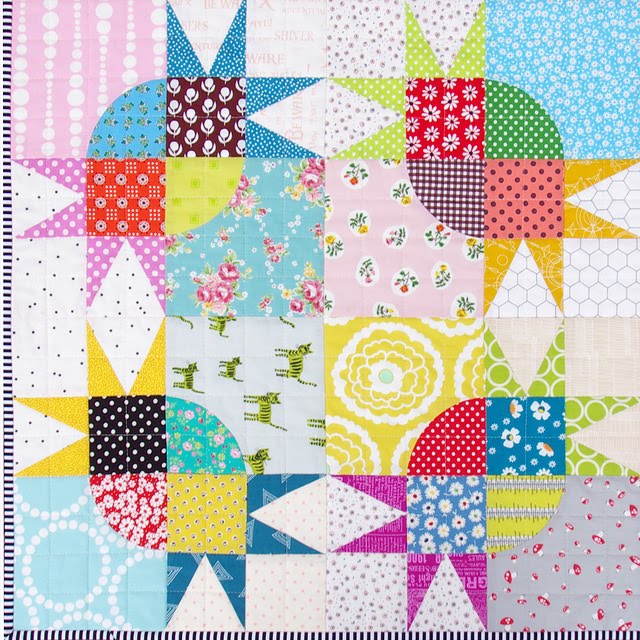
... and for some time now, has been to make a quilt without having to bind it. I thought it wise to start with a small project to trial this method of quilt making. And naturally you can't stop at just one ...
.jpg)
I am sure it wasn't an original thought, and it wasn't even necessarily a process that would be time saving. It was more to create a different, sleeker and perhaps modern look to something that is steeped in tradition. For someone like me, who dutifully binds quilts and is comfortable with the process, it is even a little outside of my comfort zone.

Much of the process is the same as usual and I started by making a simple quilt top. I've used fabrics from the Tidbits and Treasures fabric collection by Linda Jenkins and Becky Goldsmith from Piece O' Cake Designs ( as previously posted in Sunday Stash #107) as well as a few added extras.

I then pin basted the quilt top together with a layer of batting, but no backing fabric. It is at this stage a quilt sandwich of just two layers: the quilt top and the batting. There really is no avoiding the basting process.

I then thought it beneficial to stabilize these two layers, and stitched in the ditch along three vertical seam lines and four horizontal seam lines. These stitching lines disappear into the seam line and are really there just to ensure that these two layers don't shift.


Once I had finished the foundation "in the ditch" quilting lines, I removed the basting pins, trimmed off any excess batting and then zig zagged around the edge of the quilt.


It then measured the quilt sandwich and cut the backing fabric to the exact same size. The backing fabric and the quilt sandwich were then pinned right sides together and I stitched around the outer edges with a 1/2 inch seam allowance, reinforcing the corners by stitching back and forth several times. I left a gap large enough to be able to turn the quilt inside out.

I stitched around the edges of the quilt to stabilize the edges, and then quilted it with straight lines. I tried to ensure that the quilting lines were unbroken, turning at the edge of the quilt rather than having to cut the threads and bury the ends in the batting.
I stitched around the edges of the quilt to stabilize the edges, and then quilted it with straight lines. I tried to ensure that the quilting lines were unbroken, turning at the edge of the quilt rather than having to cut the threads and bury the ends in the batting.

Backing fabric from Picnics and Fairgrounds by Denyse Schmidt
This method of making a quilt without binding worked well for these relatively small quilts. I do love the look of the these quilt edges but I can't be too sure that it is a time saving technique (as compared machine stitched binding). Of course, it isn't always about saving time.

Oops, lengthy post! Feel free to email me or ask questions in the comments sections about this tutorial.

Rita


I love this way to finish a quilt.Your quilt stunnning.Well done!1
ReplyDeleteAnother great innovation Rita!!
ReplyDeleteI've been wanting to make a quilt without binding for a while now but it just seemed like a lot more work!! I love the clean look though, I may just have to give it a try. Thanks for the reminder Rita!
ReplyDeleteIt does create a very neat finish! I'm inspired to try one myself.
ReplyDeleteLovely quilts.
ReplyDeleteI call that the "pillow case" method! I prefer the look of binding but each to her own of course!
fun!! It does look sleep and modern for sure. And a way to save fabric too I'd think!
ReplyDeleteLooks great and I love how clean and modern in looks. I'll have to try this.
ReplyDeleteI think it gives a fresh modern take on the traditional and there most definitely is a place for quilts finished like these.
ReplyDeleteWOW they are amazing! I love all those bright colours and think no binding really shows them off well without a 'frame'. Great tutorial, thanks!
ReplyDeletexx
I have often wondered about that but never been game to try. Thanks for giving it a shot Rita, and for all the gorgeous pics, your quilts are amazing!! xo
ReplyDeleteI do this all the time. I usually save the quilting 'til just before closing hole on edge. If you quilt from opposite the hole, it works great. Basically just cuts out one step. :o)
ReplyDeleteI have a large postage stamp quilt that was made by my great grandmother almost 70 years ago and it is not bound. It appears that she turned the edges in 1/4" and did a whipstitch all around the quilt.
ReplyDeleteThis quilt has been used, although not excessively, but the edges are coming open. I think the method you have used will definitely allow for more durability, but I still think a double fold binding will allow for more durability. I fear I may have to put a double-fold binding on it to ensure it doesn't fall apart.
These quilts look wonderful Rita, great colours and I love the no binding finish.
ReplyDeleteStephanie, i hope that you will take the time to put a binding on your vintage quilt. Your great-grand children will thank you in another 70 years!!
ReplyDeleteI do love this quilt though, how do you finish the open end?
Wonderfully colorful quilts! This is a method I use frequently for flannel blankets or small baby quilts. I do find it faster than binding, and I think it makes for a nice edge too! Sometimes I use a decorative stitch on my machine to sew around the edge for a fancy touch!
ReplyDeleteMGM
i really do like this look for a small quilt. not sure it would suit a larger quilt. Lovely quilts!
ReplyDeleteWhat a great tutorial. Thank you so much!!!
ReplyDeleteThat's a very interesting way to finish off a quilt! I"m going to make some baby quilts and give it a shot here soon. :) Very neat looking. But then all your quilts look very precise and neat! :)
ReplyDeleteI have done small projects this way, such as placemats, coasters, etc. It is a quick finish to simple projects!
ReplyDeletethis is how my mom did all of her patchwork blankets... i think it's called 'pillowcase' style.
ReplyDeletelovely as always!
xo
eva
What a fabulous idea, and the quilts look just wonderful. Thanks for sharing.
ReplyDeletenice work; that's how i did baby quilts i tied -- made a *pillowcase,* like you, sewed around the side, leaving some open to turn, turned the quilt, then stitched around the edged and tied the quilt ... i never thought of this for *real* quilts, quilts that ya'll *quilt* ... LOL ... thanks, rita, your work is always inspirational ... darlene
ReplyDeleteYou always bring something new and fresh to quilting and I love seeing what you are going to do next. Thanks for sharing this tutorial! I am new to quilting and binding is something I struggle with, but I will have to give this a try.
ReplyDeleteThey look great! I think it would definately save me some time since I hand stitch my binding on (I am not very fast). Something to keep in mind :)
ReplyDeleteSmiles~Beth
The quilts are fabulous, as always. You are always such a huge inspiration. Thanks for sharing the how-to!
ReplyDeleteTRIED IT+LOVE IT! WILL USE THIS FOR SOME OF MY CHARITY BABY QUILTS! HAVE YOU NOTICED SOME QUILTS LOOK PRETTIER WITHOUT A BINDING. THANKS FOR SHARING!
ReplyDeleteVery fun and different way of finishing a quilt. Pinning this for the future. :)
ReplyDeleteI really love how it turned out. I think this is a method I would use with a more colorful quilt where I have difficulty in finding a binding that I think complements the quilt. Yours turned out beautifully!
ReplyDeleteBeautiful quilts ... My cousin has a lovely old quilt made this way ... I too have used it for placemats and other small stuff ... but these look faberooni Rita ..
ReplyDeleteAbsolutely breathtaking...as always...LOVE what you do.
ReplyDeletesuch a coincidence! I was just wondering last week if this was possible! I hate binding. Hate hate hate, and I rarely bind without at least one mistake, which requires alot of stitch removal. Why did you zig zag stitch around the top before you sewed the back right side up?
ReplyDeleteLove it! I finished a twin sized quilt without binding by following a similar method, except that I hand quilted it to finish. I really like the results. Thanks for walking us through your method.
ReplyDeleteThis is how I made all of my quilts when I first started because I was too scared to bind them! Every once in a while I go back to this method because I really do like the way they look!
ReplyDeletelove it!
ReplyDeleteI've been making quilts without binding too, and it works great with table runners, mug rugs and any mini quilts...
love your tip about stitch the batting with the top, that is very clever!
thanks for sharing Rita!
What a great concept! You're right, a modern spin on an age-old tradition -- I am new to quilting and it never even crossed my mind to do one without binding -- I love it! Thanks for sharing your tutorial, I will definitely be giving this a try in the future!
ReplyDeleteSo cool. I am always trying to think of ways to not do binding. Or do it differently. Your method does give it a very modern touch.
ReplyDeletethis is a clever idea...and it turned out so great!
ReplyDeleteThese quilts are so "happy" and cheerful with all their color! Great job, as always. Interesting idea to finish a quilt without a binding, and a quick solution to the last minute quilt for disaster donation quilts. I'd like to know what fabric line the large flower print is a part of? It is a beautiful print and stunning in these quilts. Please let us know if you can! Thanks!
ReplyDeleteThirty-five years ago I made "pillow case" baby blankets for all the showers I was invited to. I even put eyelet lace into the outer seam for some of them. My trick was to back it with a gingham check and use that as a guide for tying the quilt. I still have the first one which was given to me after my 35 year old son was born. Glad to see the idea resurrected.
ReplyDeleteThis is great and I'm not sure I would have ever tried it until seeing it here. A lot of my quilts have white backgrounds, though so I worry about the white edges getting dirty with no binding to protect them. Of course, a quick border would take care of that! :)
ReplyDeleteMy husband's grandmother made all her quilts we have without binding and our son sleeps under one she made for his dad. I love the addition of machine quilting as she tied all hers. I'm curious about the hold of the stitches and will have to give it a go!
ReplyDeleteThis is fabulous! I love the idea of not doing a binding every once in a while to mix it up. It looks modern and very fresh. Thanks for the wonderful inspiration!
ReplyDeleteThis is the method that I use to make placemats. Quicker than binding and I like the look. Love the backing fabric on these!
ReplyDeleteThis is the method that I use to make placemats. Love the backing fabric!
ReplyDeleteLove it, love it!! Time for me to start quilting. I've put this craft off too long. I've had binder-itus fear too long. Thank you for such a wonderful tute. I'm gonna give it a try.
ReplyDeleteVery cute quilts! I have used this method several times and if I want the binding look, I just put the backing color as the squares along the edges.
ReplyDeleteI know this as an "envelope binding" though quite why I don't know as you don't turn envelopes inside out...
ReplyDeleteThanks for posting this---I am a beginner quilter and this method is much less scary to me---Question: how far apart do you put your pins when sewing the two layers together. I seem to have some slippage, so I must not be putting in enough pins! Thanks.
ReplyDeleteI Love the Look of this Quilt! New to Quilting, what Brand and type of Batting did you use that is didn't get caught up in the feet of your sewing Machine? when you just sewed the two pieces together? Thanks very much for sharing!
ReplyDeleteHuggs, Nancy
Okay, so you quilt the top and batting, and then do an inside out pillowcase method with the backing? Is that it? So the backing is not at all quilted? Trying to make sure I understand it. Thanks.
ReplyDeleteNicely done! I've seen this method before, and I think it does give a clean and modern look.
ReplyDeleteLove it! I hate making and sewing bindings on! thanks!
ReplyDeleteThanks for your tutorial! I just did this today to finish off a quilt for a friend. It worked great! I gave it an added touch of rick rack when sewing the top and bottom together.
ReplyDeleteThe Quilting Sourcebook by M. McKormack Gordon calls this method "Bagging" It does give a nice finish.
ReplyDeleteI have heard this method called "birthing" a quilt, because, if it's big enough, you need to roll it up on itself before passing it through the hole. Everything old is new again!
ReplyDeleteI too hate doing bindings - this is the only way I do my baby quilts and have for years. Much easier and a cleaner look. Thanks for posting it!
ReplyDeleteHow do you keep the batting for getting clogged in the machine?
ReplyDeleteI did this method with a full sized t-shirt quilt that I made for my daughter. It worked out very well. After flipping the quilt, we (she and I) pinned it evenly across and used a wool yarn to tie it. Instead of using batting I used a plaid flannel sheet for the backing, it made the quilt reversible and gave me a pattern to follow for tying the yarn.
ReplyDeleteI am looking at this and remembering that this is how I made my first quilt about 30ish years ago....I had forgotten all about it as over the years since I have learnt a number of different ways of binding etc. But this is so easy and does look lovely. I will certainly be trying it out again. Thank you!
ReplyDeleteI'm thinking of trying this out on a simple quilt for my daughter's bed. It wouldn't change anything to sandwich either rickrack or piping in there would it?
ReplyDeleteLove this idea and the results. I do think it would be a time-saver, as just making the binding takes time - let alone sewing it on just right. I actually did this technique with dog "beds" for my local shelter, but I didn't first sew top and batting together. I just sewed all 3 layers together at the same time. Is this extra step necessary if you've pinned very well? Maybe it would be wise when working on something sizeable.
ReplyDeleteever try this with a twin size quilt? I love the look!
ReplyDeleteMy grandma taught me this method about 16 years ago. It's the only method I've ever used on quilts big and small. It's fantastic if your too last to bind like me!
ReplyDeleteI have a table runner I've been working on and have been trying to figure out the binding......I think you just helped me to do so!! Thank you so much!!
ReplyDeleteHow wonderfully clever! I put together a small quilt this weekend to simply practice my piecing skills - now I know exactly how I'm going to finish it! Thank you so much.
ReplyDeleteLea
Thanks for the tutorial, just love it! I am working on charity quilts and the binding process just takes too long and too much fabric that I could be using for other quilts! so this idea is just PERFECT!
ReplyDeleteThank you so much, I've tried to do this before, but I didn't stabilize the layers well enough and it was all shifty. Your tutorial will really help. Thanks!!
ReplyDeleteI love this! I remembered seeing this on pinterest and wanated to do it to the quilt I'm making now, but I already quilted all three layers. I never would of imagined the method you used. Oh well next project.
ReplyDeleteSo I did something kinda like this last night on my quilt that I had already quilted. It turned out great and I put it in my new blog. Here is the link, it has a link back to this. http://rednecksoccermom.blogspot.com/2012/10/non-binding-binding.html
ReplyDeleteI'm dying to try it your way next time, looks much easier!
I just did this on a quilt I've been working on, and I love it!!! Thank you so much for this!
ReplyDeleteJust to give you some info the reason you use a bias tape to bind the quilt is because the edge of the quilt takes the most beating. With a bias edge you dont have as much rubbing on one thread on the edge. If you ever have an old quilt look at it and you can see what I'm talking about. the treads are crossing instead of running all along the edge
ReplyDeleteThis was how I was taught many years ago...the pullowcase method. I teach beginner quilters this.
ReplyDeleteOh wow, stunning quilts.
ReplyDeleteJust finished a quilt this way for my daughter. I just don't know how to finish the turning hole without having the thread be all obvious. Any suggestions?
ReplyDeleteThese would be great for making quilts for charity.
ReplyDeleteSo so pretty. Great pictures. I've only made one quilt, but what fun!! I'm a bit afraid of becoming addicted.
ReplyDeleteHi! I was wondering, what was your method for sewing shut the gap you left to turn the quilt right side out? I am using this method on my current quilt and wanted to make sure I do it right :)
ReplyDeleteHi Amber ~ Slip stitch, by hand. Not one of my favorite tasks.
DeleteI love this technique. I wish I'd found your blog and tutorials sooner. I made myself a 'quillow' for travelling and used this method and it worked a treat as I was able to make the quilt in a couple of days in fits and starts. Instead of hand stitching the opening once I had turned it through, I sewed around the quilt a bit under a 1/4 inch from the edge to catch the opening and hold down the seam allowance.
ReplyDeleteGreat tutorial, with great tips in it.
Thank You so much for this tutorial on the binding-less method of quilting! For months now, I have been directing my volunteers to this specific post on how to complete our preemie quilt kits!
ReplyDelete~Samantha DeMato, Founder of March of the Blanketeers
Found this on Pinterest! Looking forward to giving this a try on some baby quilts.
ReplyDeleteJust finished my second quilt ever and I used this method... It turned out great! Thanks for the wonderful tutorial!
ReplyDeleteI have just started quilting....and felt as though I was not doing it the "right" way....because I do not use binding on any of mine.....:)
ReplyDeleteThis is great, and what a perfect method for smaller sized baby quilts!! I definitely will try this!
ReplyDeleteI love to hand bind quilts as I find it relaxing but now I'm thinking it's time to try something new. A no binding quilt might just be a good change.
ReplyDeleteThanks for the tutorial.
I am making five quilts for Christmas and one of them screams for this method, thanks for helping me over the hump
ReplyDeleteI just made my first quilt top and it's a sleek modern look and I googled to find if there was a way to finish a quilt without binding and came across this. It's exactly what I want to do and I'll be doing it tomorrow!
ReplyDelete